Shopify is one of the most popular ways online businesses do business. It’s a very functional, robust, out-of-the-box solution for selling products of all sorts, and it has plenty of added functionality between various apps and integrations.
So, if you’ve been running your business for a while, chances are you want to advertise your products. You’ve also likely heard that Facebook and Google are the two best ad networks to use.
Is that a good idea, and how can you integrate them?
Key Takeaways
Integrating Shopify with Facebook and Google Ads offers:
- Massive Reach: Facebook and Google offer unparalleled audience targeting.
- Essential Preparation: Store updates and merchant accounts are prerequisites.
- Storefront Access: Password protection must be disabled for ad integration.
- Optional Apps: Shopify apps can assist but aren’t required for ad management.
Check out our Google PPC management service and social media marketing service.
Why Choose Facebook and Google for Advertising?
Facebook and Google are generally considered the best and largest ad networks, particularly for small and mid-sized businesses. There are a few reasons for this.
The first is market share.
Facebook and Google reach billions of people with various channels and services, meaning any ad you run has guaranteed potential to reach the people you want to reach. Virtually every other ad network is smaller in some way, making it potentially less valuable to use for marketing, dollar for dollar.
Of course, sheer size isn’t the whole story. Posting an ad that reaches every single person worldwide would guarantee that you reach every possible customer. Still, you would also be spending an immense amount of money to reach many people with zero possibility of becoming customers.
That’s where the second significant benefit of Facebook and Google comes into play: targeting. Target audience options are available on almost every ad network, but some are much more robust than others. Facebook can leverage an immense wealth of data from user accounts, behavior tracking, and app tracking. Apple’s recent privacy changes have hindered this somewhat, but it’s still among the best in the business.

Likewise, Google harvests an incredible amount of data about users, including demographic, interest, and behavioral information, most of which they allow you to use as the basis of aggregate targeting in Google Ads. All of this means that you can narrowly and aggressively target your ads to people most likely to be interested in your products without wasting money showing your ads to people who don’t have much or any interest (or ability to purchase.)
There are also native ways to integrate Facebook and Google Ads into Shopify stores. You don’t have to worry about third-party apps and services, automation management platforms, or other intermediaries getting in the way of – and taking some of the price of – your ads for themselves.
You can also bet that both Facebook and Google are on the cutting edge of advertising technology.
Any new developments in advertising are likely to come from, or be rolled into, these platforms with a swiftness that would make a developer’s head spin.
The sheer number of potential customers available through Facebook and Google makes them ideal for businesses looking to expand their reach. By setting up ad campaigns on both networks, you can increase your visibility and reach a wider audience than other advertising methods.

Facebook and Google Ads are also relatively easy to set up, meaning even small businesses without an in-house advertising team can easily create effective campaigns. Additionally, both platforms offer detailed reporting features so you can track the performance of your campaigns and adjust as needed.
Preparing Your Shopify Store
Before you can add either kind of advertising to your Shopify store, you need to lay the groundwork:
- First, ensure that your store is up-to-date and all the necessary information is filled out, such as payment methods and shipping information. This step is crucial because it will ensure that your customers can purchase from you quickly and easily.
- Next, you’ll need to ensure that you have the appropriate merchant accounts with both Google and Facebook. These accounts will be necessary for you to be able to advertise through their respective networks. You can typically find these accounts under the “Ads Manager” tab in your Shopify settings.
- Finally, consider using one or more available Shopify apps to help manage your ad campaigns. These apps can help automate tasks like creating and managing ads and tracking performance metrics like impressions, clicks, and conversions.
1. Make sure your Shopify store is prepared.
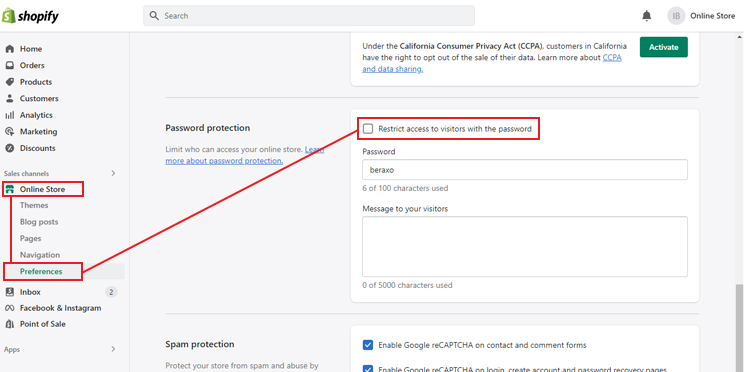
Similarly, it would help if you disabled that password protection. Note that this does not mean that you need to have no password on your admin account. Instead, it refers to the password gateway that hides your storefront from users. If your storefront is hidden from users that aren’t logged in, ad networks won’t be able to visit your site to confirm that your tracking code is installed correctly.
There are two ways to remove this password protection from a Shopify store:
- Log into Shopify. From your admin dashboard, click “Online Store” then “Themes.” You should see a banner that says, “your online store is password protected.” There will be a “remove password” button, which you should click.
- Log into Shopify. From your admin dashboard, click “Online Store” then “Preferences.” Look for the Password Protection section. There, uncheck the box labeled “Restrict access to visitors with the password.” Save your changes.
Either way, make sure this is done before you proceed.
2. Make sure you have the appropriate merchant accounts.
The process’s second step is registering merchant accounts with Facebook and Google.
For Facebook, you need to create a Facebook Business Page. A Business Page is a specific type of page with business features; ads cannot be run or managed through personal profiles or non-business pages. If you still need to get a Facebook Business Page, you will need to create and configure one for your brand before proceeding.
We’re not done yet, either.
You will also need to ensure the Facebook Business Manager is connected to your Business Page. This step is required to run Facebook ads. The steps on that page will have you set up and running in short order if you don’t already have this configured.

For Google, you don’t need quite as much setup ahead of time. However, you need to ensure that you have a Google Ads account and a Google Merchant Account.
To create a Google Ads account, visit their page and create an account for your business. It’s generally a good idea to have a business Google account rather than managing your business with a personal account.
As for a Google Merchant account, you will need to visit the Merchant center and create your account there.
3. Do you need to use Shopify apps for your ads?
A common question is whether or not you need to use apps for your Shopify store to manage either Facebook or Google ads.
The answer is no, though you can if you want.
Facebook does not require an app to manage ads using your Shopify products and collections. They generally prefer that you use their business manager to create and manage ads, so the number of apps and platforms that can manage Facebook ads is very restricted.

Google has an official app for its various services called the Google Channel. Until recently, Shopify managed this, but they have turned control over it to Google, which now keeps it updated with the latest tracking code and features. However, this app has mixed reviews and little support, so you may be better off implementing Google code manually.
If you want to browse the Shopify app store and see what is available for managing your ads on one or both of these platforms, you can search for it quickly enough. Here are the results for Google and similar apps for Facebook.
4. Do these integrations cost money?
No. It’s free to add tracking code and integrations between Shopify, Facebook, and Google.
That said, running ads is not free. You need a paid version of Shopify to access these features and pay to run ads on both Facebook and Google.

However, you pay only what Google and Facebook charge or any third-party app developer charges for their services. Shopify doesn’t skim anything off the top of the ads you buy.
Connecting Shopify and Facebook Ads
Now let’s get into the steps you need to add Facebook to your Shopify account. This should be a straightforward process as long as you’ve laid the appropriate groundwork in the previous stages.

Start by logging into your Shopify account and going to your admin dashboard. From here:
- Click the + next to Sales Channels.
- Click the + next to Facebook and Instagram.
- Click Update Sales Channel.
- Click Start, and follow the instructions to configure certain information about your store, which will generate a Meta Pixel (tracking code) that you will add to your Shopify site.
- Click the Connect Account button. This step will authorize the connection between Shopify, Facebook, and Instagram.
- Accept the terms and conditions, and click Finish to finalize the connection.
Two notes here.
- First, sometimes there is a slight delay in connecting to Facebook Ads, mainly if you’ve just created a new business page and account. There are no additional steps to take but to wait.
- Second, Facebook and Instagram ads are managed through the same system since the same company owns them. You can only connect one or the other, as they are the same account. You don’t have to run ads on Instagram; that’s a matter of placement later.

It’s also generally recommended that you enable enhanced data sharing with the Meta Pixel to maximize the amount of targeting information Facebook can harvest from your users for use in ad targeting.
Connecting Shopify and Google Ads
The process for connecting Shopify and Google is similar to that of connecting with Facebook.

The first step is to verify your site. On the Google Merchant page, you will see a process for verifying your website.
Google will give you some HTML code under the meta name Google-site-verification. Copy this code – it will be a nonsense string unique to you – and add it to Shopify.
Before you begin, note that if you have Google Analytics or any other Google tracking service installed, you are already verified and can skip this step.

To do this:
- Log into Shopify and click on Themes.
- Click the Action drop-down and click Edit Code.
- Choose the theme.liquid file to edit.
- Under <head>, add a new line and paste the meta verification code.
- Save the change, return to your Google Ads tab, and verify.
Google will then send a crawler to check for that code in your store and, if present, will verify your site. You can then click Claim Website to claim the site as well.
Next, you will need to finish adding the sales channel. In Shopify:
- Click the + next to Sales Channels.
- Click to add a Google Sales Channel.
- Confirm your email address.
- Confirm your customer ID with Google.
- Finish the process to enable Google connections.
Need Help?
If you need help with your Google PPC or Facebook advertising, let us know; drop us a line! We won’t push you into something you don’t need; we’ll chat, offer you friendly advice, and leave the rest up to you.